Welcoming to the Act III Walkthrough Guide for Diablo II: Resurrected. This guide will explain Act III Quests, how you can complete them, and how to unlock Act IV in Diablo II: Resurrected.
The Kurast Docks is your place of refuge from home in Act III. As soon as you enter you will have the opportunity to speak with Hratli one of the blacksmiths of this town. When you leave town for one of the first times, he'll go back to his home within the middle of the small village. Because the Docks are more dispersed as compared to the other town, it's essential to record where the resident lives in case you have to fix your equipment. Speaking of equipment, resistance remains the king of Act III. You'll likely have a better idea of what your final build is going to look like at this point which is why it's important to choose gear that is compatible with your requirements. Also, even though you could probably skip most magical gear, we recommend always picking charms to see whether they're helpful. In time, your gear will provide the resistance you need, but when you're at lower levels, it's always good to have a little bit of help.
After you've left town, you'll come across Diablo as the "Lonely Wanderer." You're not able to fight the guy at this time however, he'll soon vanish. He's left behind a group of Flesh Beasts that will be able to quickly defeat. If you go on through in the wild, you'll encounter a Unique or Champion monster. If you hunt one of these, they will drop the Jade Figurine. Take this back to town and hand it over to Meschif. He'll gift you an Golden Bird, which you can present to Alkor. He'll also give you an elixir called"the Potion of Life. This will grant you 20 additional HP Drink it now.
Quest 2: Blade of the Old Religion and Quest 3: Khalim's Will
We're putting these two quests together because you'll have to complete the second quest and work on the final. The third part of Diablo 2: Resurrected is possibly the most challenging because there is a Jungle in Act III can be so confusing to navigate. This is because the different areas are connected at random. In some cases, you'll need to walk across the Spider Forest to get to the Flayer Jungle and other times you'll have to make your way to The Great Marsh. The best advice we can give is to stick the outside edges of the map to the ground and look around each area to find the things you're looking for.
The Jungle contains numerous enemies, including Cloud Stalkers, Blue Hawks and Suckers. However, the most well-known adversary of Act 2 is Fetishes, which are modified version of the Rat Men you might have seen in Act 1. They are this time with their own Shamans, which means they can be revived. They Shamans also emit a plume of fire that could cause with a lot of damage. As a group they're not a lot of trouble to fight, but they tend to attack in groups of ten to more. That could become a problem quickly. We must also remember that Thorned Hulks can appear, and they can employ a version of Frenzy and make you look like a fool. Combining both of them can be deadly fast.
In general, players will find that Spider Cavern first. It's located, as you might've imagined, within the Spider Forest. Pay attention because there is another dungeon within this area called the Arachnid Lair, which is completely unimportant. Make sure you don't go to it by mistake. Inside the Spider Cavern, you'll face off against lots of Flame Spiders as well as the mini-boss. Get them down, open your golden chest and pick up Khalim's Eye.
You'll need to get to the Flayer Dungeon inside that Flayer Jungle. There's no basis or logic to making it through the Jungle and you should just try your best. When you reach the entry point to the Dungeon, you'll also notice an enormous change that is clickable. If you do this, it will spawn a group of creatures that you have to deal with. The Gidbinn will be dropped that you have to bring to town, and then give to Ormus. Then, go talk to Asheara who will then Ormus will hand you a rare ring completing this quest. Blade of the Old Religion Quest.
Then, go to Flayer Dungeon and take on the mass of powered-up Fetishes. The Fetishes aren't all that difficult on their own, however they can be overwhelming. When you're done, you'll find a mini-boss version of a Shaman. Take it down to open the golden chest and collect Khalim's brain. Continue to walk through the Jungle until you arrive at the city that has been destroyed by Kurast.
Kurast is protected by Baboon Demons, Zealots, Faithful Thorned Hulks as well as Zakarum Priests. Some such enemies appear a bit more sophisticated than your typical enemy , and will flee after taking hits. They are also difficult to kill and can result in your pulling more enemies in groups and becoming overwhelmed. Additionally, Priests are able to heal enemies, making the fights take even longer. Try to kill things quickly and don't chase them if it's into an area you haven't explored.
You're looking for the Sewers in the town. It's a huge area, and you have to stroll around the edge of the map to find the Sewers you've been looking for. Within the golden chest located in the Sewers, you'll pick up Khalim's Heart. The quest is almost over!
The last place you need to make your way to is Travincal. Work your way through Kurast's various zones Kurast until you reach this spot. Be prepared for some tough enemies. Hierophants can heal other opponents and utilize lightning and blizzard skills. They also have Night Lords, which cast Meteor as well as other fire spells, which could take your health and damage. There's also your goal your target, the Council.
On the other side of Travincal the area is home to several council members, including three which are distinctive. Toorc Icefist is cold enchanted and detonates to create a Frost Nova upon death. A quick thawing potion can be able to help you get rid of the negative effects if you need it. Geleb Flamefinger can explode into a fiery inferno after it dies, and can be fatal for certain characters. Additionally, Ismail Vilehand can inflict Amplify damage, making every one of the Council minions more dangerous.
Once you've taken all of them down, pick up Khalim's Flail. Put it alongside the Heart Eye, Heart and Brain inside the Horadric Cube, and transform them. You can then use the powered-up Flail to destroy your Compelling Orb that's found right by the Council. This will give you access to the Durance of Hate and the Act's final boss.
Finishing this quest will require some going back. If you are entering Kurast in the beginning, you can meet with Alkor. Alkor will instruct you to search the six tombs in Upper Kurast, the Bazaar, and the Causeway. Fortunately, we've learned that you just need to go into the Ruined Temple located in the Bazaar. Inside, you'll end up meeting up with Battlemaid Sarina. It's suggested to clear everything else out before embarking on the journey in case you do not want to be overwhelmed. But, if, in fact, you've dealt with everything Quest 3 had to offer then you'll be good.
Quest 5: The Blackened Temple
Fantastic news! If you've completed the 3rd quest, then you've completed this quest. The only thing you have to do is kill every member of the Council and you'll need to do to get Khalim's Flail.
Quest 6. The Guardian
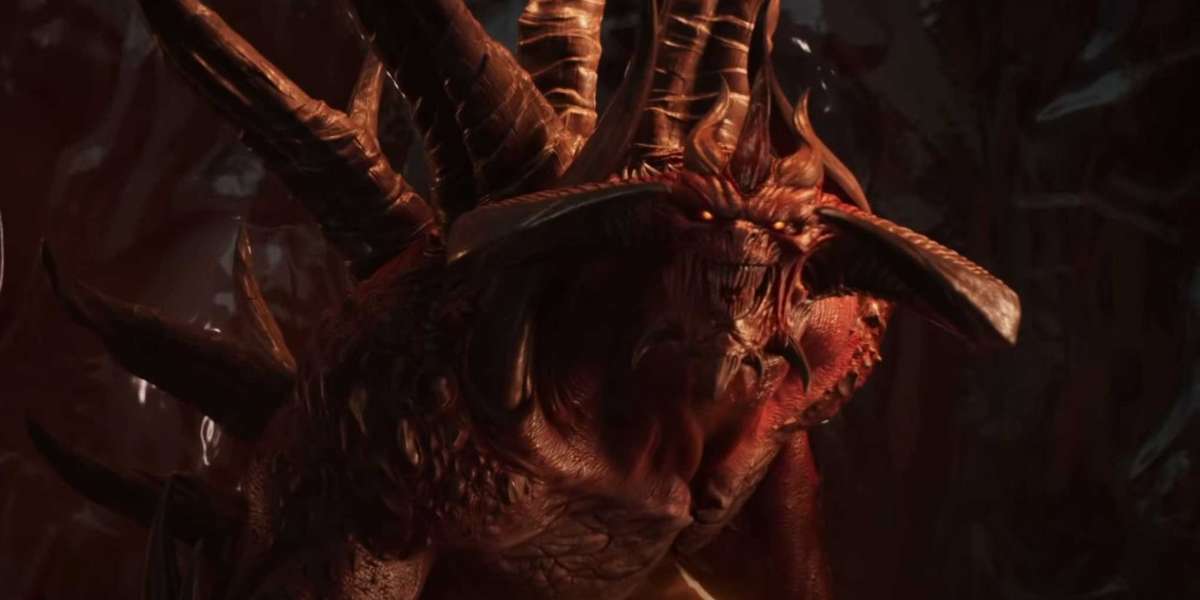
It's time to take on Mephisto who is the boss from Act III. Once you've entered into the Durance of Hate, it's ideal to remain on the left side as you descend to Level 3. You must ensure you grab the Waypoint in Level 2 though to save you time should you get killed in the process.
Within the Durance, prepare to encounter tougher versions of the Vampires you battled in Travincal. Also, you'll encounter large enemies called Maulers, which are more powerful Blunderbores who are able to stun you. This can become a problem when you encounter many of them. In the end, you'll probably have to fight at least Cadavers or Stygian Dolls. These augmented versions of monsters you battled earlier will either explode or drop the Poison Nova upon death. Be sure to watch out for those attacks.
When you reach level three, you'll run through even the more Vampires and Stygian Dolls. There are also a few Council Members and, of course, Mephisto himself. In the current scenario you're likely to make quick work of all of Mephisto's enemies, but you'll need to be on the lookout for the three mini-boss counterparts of these Council Members. We typically take on Mephisto from the right and fight Maffer Dragonhand because he's unable to transfer. However, he can pack a punch so feel free to explore both directions if struggling.
As for Mephisto himself We would advise to let him strike your summons or hireling, before he can get close and take out with damage. In melee range Mephisto doesn't employ his skull orb attack regularly, which is quite helpful. Don't be afraid to port back to the town if you have to. Another strategy is to employ the moat trick. In essence, you'll want to lure him to the blood moat in the area , and then move around so that he's stuck there on his own. In the end, you'll be able to use melee attacks to knock him out of the safe zone. This is very effective for classes such as the Sorceress who can use Teleport to swiftly lock him in place.
After Mephisto is defeated Pick up your items and the Soulstone and then head through the red portal that opens to reveal Act IV.